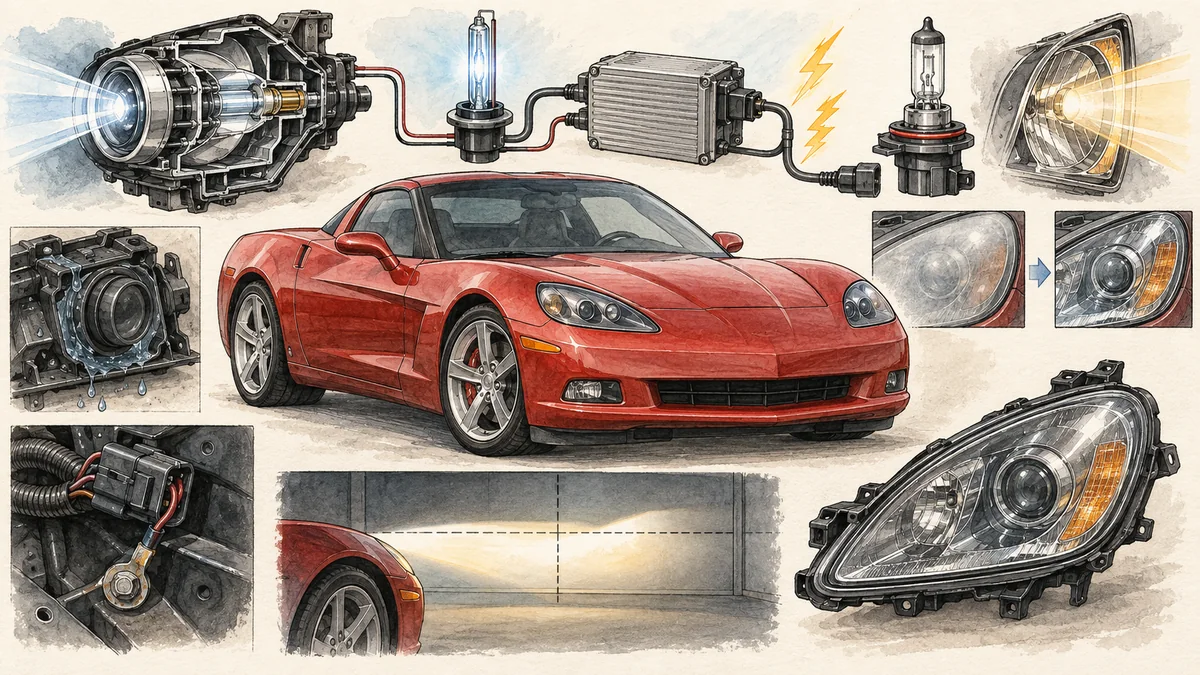
The best headlight upgrade for most C6 Corvettes is to repair the factory system before replacing it. The 2005–2013 Corvette uses a D1S high-intensity-discharge low beam and a separate H9 halogen high beam. Clear lenses, healthy HID components, sound wiring, and correct aim usually matter more than an aggressive color temperature or an unsupported lumen claim. Replace a complete housing only when its lens, reflector, projector, mounts, or sealing cannot be restored.
To place Best C6 Corvette Headlights in a wider ownership and engineering context, continue with C6 Corvette Buyer’s Guide: Trims, Trouble Spots, and Value.
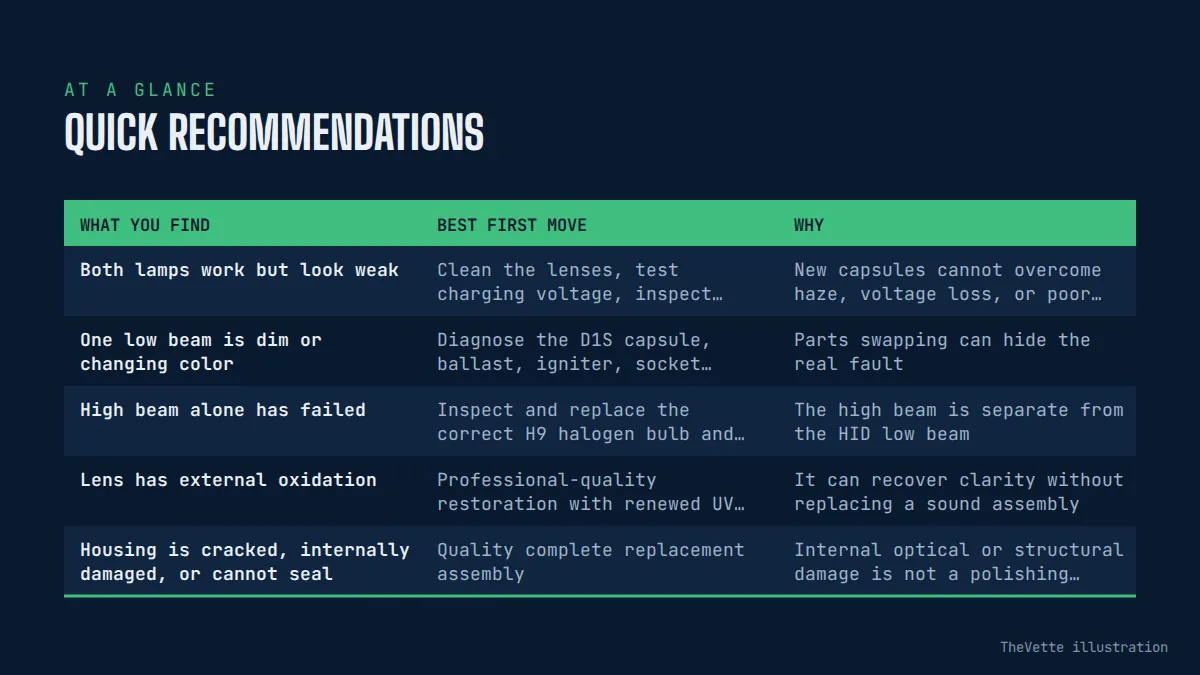
Quick recommendations
| What you find | Best first move | Why |
|---|---|---|
| Both lamps work but look weak | Clean the lenses, test charging voltage, inspect optics, and verify aim | New capsules cannot overcome haze, voltage loss, or poor aim |
| One low beam is dim or changing color | Diagnose the D1S capsule, ballast, igniter, socket, moisture, and wiring | Parts swapping can hide the real fault |
| High beam alone has failed | Inspect and replace the correct H9 halogen bulb and circuit | The high beam is separate from the HID low beam |
| Lens has external oxidation | Professional-quality restoration with renewed UV protection | It can recover clarity without replacing a sound assembly |
| Housing is cracked, internally damaged, or cannot seal | Quality complete replacement assembly | Internal optical or structural damage is not a polishing problem |
What the factory C6 lighting system uses
Philips' North American automotive application catalog identifies D1S HID low-beam and H9 high-beam sources for the 2005–2013 Corvette, with a separate 9145 fog-lamp application. That distinction is important: a C6 does not use one conventional bulb for every forward-lighting function. The HID low beam needs its capsule, ballast or control hardware, projector, lens, power supply, seals, and aim to work together.
Check the exact year, side, connector, and hardware already on the car before buying. Previous owners may have fitted replacement housings, wiring repairs, color-mismatched capsules, or aftermarket electronics. A catalog match cannot tell you whether the vehicle remains original.
Best overall choice: restore a healthy factory HID system
A sound original assembly offers known mounting, body-panel fit, aim adjustment, and electrical integration. Begin with the transparent outer lens. External oxidation and fine surface damage absorb and scatter light before it reaches the road. A careful restoration removes degraded material evenly, refines the finish through suitable stages, and applies durable UV protection. A temporary wipe-on shine is not the same repair.
Then inspect what is visible inside. A cloudy projector lens, burned reflector bowl, loose mount, water staining, or internal debris can spoil the beam even when the outer surface looks new. Internal damage normally requires specialist repair or assembly replacement. Do not open a sealed headlamp casually; poor resealing can create a recurring condensation problem.
Finally, verify electrical supply and aim. A low charging voltage, weak ground, corroded connector, or damaged harness can imitate an expensive component failure. A lamp aimed too low may appear weak at distance, while one aimed high can create glare without improving useful vision.
D1S HID capsule replacement
An HID capsule can lose output and shift color as it ages. A pinkish, purplish, or noticeably different color on one side can be a clue, but it is not a complete diagnosis. A failing ballast, unstable power, damaged connection, moisture, or internal optical wear can produce overlapping symptoms.
When age-related output loss affects matched original capsules, replacing both sides with reputable D1S products can give more consistent color and performance. Preserve the specified source type and avoid unknown capsules marketed mainly by a dramatic Kelvin number. Very blue light can reduce practical contrast and does not prove more roadway illumination.
Do not touch capsule glass with bare fingers. Follow the manufacturer's handling instructions and make sure the base is fully seated. More importantly, respect the service boundary: Chevrolet's C6 owner manuals warn that the HID system operates at very high voltage and direct low-beam replacement to the dealer. A trained technician with the correct procedure is the sensible choice when the HID circuit must be opened or energized diagnosis is required.
Ballast, igniter, or capsule: diagnose before ordering
A completely dark low beam does not automatically mean the capsule has failed. Check the relevant fuse information, connector security, visible harness damage, water intrusion, and system voltage without defeating safety protections. Diagnostic substitution between sides may isolate a part on some systems, but HID components can generate dangerous voltage. Leave that process to a qualified technician using the service information.
Intermittent operation can come from a connection that opens with vibration or heat. A lamp that starts and then shuts down may implicate more than one component. Record whether the fault is cold-only, heat-related, weather-related, or triggered by bumps. That evidence is more useful than buying a low-cost kit of unrelated parts.
Choose replacement electronics by documented C6 fitment, connector compatibility, sealing, electrical specifications, warranty, and manufacturer support. The cheapest generic ballast may introduce radio interference, inconsistent starting, poor weather protection, or a new connector problem. Never bypass a fuse or improvise exposed splices.
The H9 high beam is a separate repair
The H9 halogen high beam is simpler than the HID low beam, but it still depends on correct filament position, clean optics, good voltage, and proper seating. Use a reputable H9 bulb meeting the required road-use specification. Do not substitute a higher-wattage source merely because it fits after modification; added heat and current can damage the connector, reflector, wiring, or housing.
Performance halogens can trade lifespan for output. Long-life bulbs emphasize durability. Blue coatings may create a whiter appearance while filtering some light. For real night use, a correctly focused and aimed beam is more important than packaging language.
Why a loose LED bulb is not the default answer
An LED replacement may physically fit an H9-style opening yet place its emitters differently from the halogen filament for which the optic was designed. That can create a bright foreground, scattered glare, dark zones, or reduced distance vision. A garage-door hotspot and a large raw-lumen claim do not establish compliant road performance.
NHTSA has explained that a complete integral LED headlamp can be designed to comply, while a loose replacement light source must meet the rules applicable to that headlamp system. The agency's cited interpretation states that an LED replaceable source was not permitted in a replaceable-bulb headlamp under that framework. Federal requirements and state installation rules both matter.
Cooling fans, heat sinks, drivers, adapters, and resistors also add packaging and reliability concerns. They must not interfere with covers, seals, wiring, ventilation, or adjustment. A product listing that says “off-road” should not be treated as a road-use certification.
When a complete replacement assembly makes sense
Replace the assembly when mounting points are broken, the housing or lens is cracked, internal optics are burned or loose, water damage is substantial, or a previous repair cannot be sealed and aimed correctly. A complete aftermarket unit may also be reasonable for an owner seeking a modern appearance, provided it offers credible engineering rather than decorative lighting alone.
Confirm exact 2005–2013 application, left or right side, connector and ballast requirements, included components, adjustment access, body-gap fit, weather sealing, ventilation, and warranty. Ask whether service parts remain available. A non-serviceable decorative strip should not turn a minor future failure into another full assembly purchase.
Look for the manufacturer's certification for the complete lamp and evidence of a controlled US low-beam pattern. NHTSA notes that a DOT mark is a manufacturer's certification, not a government product approval. The mark alone is not a substitute for a credible maker, traceable model, installation instructions, and useful photometric documentation.
Lens restoration or lens replacement?
Restoration suits uniform external haze with a structurally sound lens. It is less appropriate for deep cracks, severe stone pitting, heat deformation, internal crazing, failed mounting edges, or contamination behind the lens. Examine the assembly in dry and wet weather before deciding.
If an aftermarket clear lens is installed, the quality of its molding, optical surface, coating, adhesive joint, and fit all matter. A clear-looking part can still distort the beam or leak. Rebuilding an assembly requires careful temperature control, clean handling, compatible sealant, correct venting, and a final leak and aim check. For many owners, an experienced lighting rebuilder is safer than an improvised oven procedure.
Condensation and water intrusion
A light temporary mist after a temperature change can differ from standing water, repeated droplets, or visible staining. Headlamp housings often use controlled ventilation; sealing every vent is not the cure. Inspect caps, gaskets, lens seams, vents, impact damage, and wiring entries to find the path.
Drying a housing without fixing the leak only resets the symptom. Water can damage reflectors, connectors, and HID electronics, so persistent moisture deserves prompt attention. Replace damaged seals with compatible parts and verify that all covers are seated without trapping wires.
Aiming after any lighting work
Check aim after removing an assembly, restoring or replacing major optical parts, changing suspension height, repairing front-end damage, or installing a new lamp. Use level ground, correct tire pressures, normal vehicle loading, and the service procedure. Generic wall measurements can be misleading because headlamp designs and regulations differ.
The low-beam cutoff should be controlled and repeatable, with both sides positioned as specified. Excess upward light creates glare; excessive downward aim shortens seeing distance. High beams should add useful reach rather than light trees or the immediate pavement. Complete the assessment on a safe familiar route and stop before making adjustments.
How to judge a C6 headlight product
| Question | Good evidence |
|---|---|
| Does it fit my car? | Exact model years, side, connector, included ballast or adapter, and installation instructions |
| Will it produce a useful beam? | Complete-lamp photometry or credible beam documentation, not raw lumens alone |
| Is it intended for US road use? | Traceable manufacturer certification and application statement |
| Can it be aimed? | Accessible adjusters and a defined procedure |
| Will it survive weather? | Documented sealing, vent design, condensation guidance, and warranty |
| Can it be repaired? | Available capsules, ballasts, drivers, seals, or replacement support |
A sensible troubleshooting order
- Identify whether the low beam, high beam, or both are affected.
- Compare color, brightness, startup behavior, and beam shape from side to side.
- Inspect the outer lenses, internal optics, mounts, caps, vents, and moisture.
- Confirm battery and charging health plus visible connectors and grounds.
- Use a qualified technician for high-voltage HID diagnosis.
- Repair the known fault with the specified source or compatible component.
- Restore sealing and verify that wiring is secured away from heat and movement.
- Aim the completed system and test both functions safely.
If the car has broader electrical symptoms, investigate those before condemning both lamps. The site's guide to a Corvette battery that keeps dying explains parasitic-draw and charging checks, while the C6 Corvette buyer's guide covers the wider inspection context.
Common mistakes to avoid
Do not order by appearance alone, confuse color temperature with output, install higher wattage, touch capsule glass, leave a cover unsealed, block a designed vent, or aim by guesswork. Do not assume a new capsule will repair a burned reflector or failing ballast. Avoid permanent harness cutting when a correct service connector exists.
Also avoid replacing one aging component after another without documenting symptoms. A deliberate diagnosis can prevent mismatched capsules, duplicate labor, and an assembly full of low-quality adapters. Keep the removed original parts until the repair has passed nighttime and wet-weather checks.
Frequently asked questions
What headlights does a C6 Corvette use?
Philips' application catalog lists D1S HID for the low beam and H9 halogen for the high beam across 2005–2013 Corvette applications. Verify the exact vehicle because earlier modifications may have changed its hardware.
Can I replace the C6 HID bulb myself?
Chevrolet warns that the HID system operates at very high voltage and directs low-beam replacement to the dealer in the owner-manual procedure. Owners without the correct training and service information should use a qualified technician.
Why is one C6 headlight pink or purple?
An aging HID capsule can shift color, but ballast behavior, voltage, connection problems, moisture, and optical deterioration can overlap. Diagnose the system before ordering parts.
Should D1S capsules be replaced in pairs?
If matched capsules have aged together, paired replacement can keep their color and output more consistent. A premature single failure still deserves circuit and moisture inspection.
Are aftermarket LED headlight assemblies legal?
Legality depends on the complete design, certification, installation, and applicable federal and state rules. A DOT mark represents manufacturer certification rather than NHTSA approval. Request documentation for the exact complete assembly.
Final recommendation
For most C6 owners, retain the factory architecture and restore it properly: clear protected lenses, sound projectors and reflectors, reputable D1S low-beam capsules, correct H9 high beams, healthy electrical supply, dry sealed housings, and precise aim. This produces a safer and more predictable result than a random collection of brighter-looking parts.
If the original housing is structurally or optically beyond repair, choose a complete C6-specific assembly from a traceable manufacturer with credible beam, compliance, fitment, sealing, and service information. Treat the high-voltage HID section as professional work, and judge every option by useful road illumination and glare control—not by color or marketing numbers.